 Taxidermy supplies and tips
Learning taxidermy
History of taxidermy
Bird taxidermy
Skinning and cleaning bird<
Construct artificial body
Mount bird skin
Bird study cabinet
Mounting small and medium birds
Mounting large birds
Coyote taxidermy
Deer taxidermy
Fish taxidermy
Muskrat taxidermy
Squirrel taxidermy
Taxidermy panels and shields
Making animal fur rugs
Taxidermist hunting
Taxidermy mounting kits
Other resources


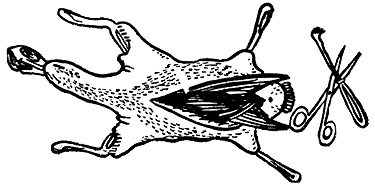
Skinning and cleaning bird
To begin skinning, lay the bird upon a newspaper, head to left of you, on the bench. Have cornmeal handy.
Part the belly and breast feathers up middle. With a scalpel make an incision (see Fig. 1) from within one inch of front end of breast bone back to a quarter-inch forward of the vent in large birds, and to the vent in small ones. Use care not to cut through abdominal wall, which is usually very thin and may easily be confused as a part of the skin, being closely bound to it. The two are easily separated, however.

The primary incision made, lift an edge of the skin with finger and thumbnail and carefully tear skin free from body, using scalpel when necessary to help. When thigh of a leg is exposed, take hold of
leg outside of skin and push knee forward so it is uncovered inside of skin. Sever knee joint with scalpel or scissors, using care not to cut through skin on outside of joint. Repeat on other leg. Apply cornmeal or fine sawdust if blood or juice starts.
Next set bird on end, tail up. Bend tail over backward and cut through vent lining, tail muscles, and vertebrae forward of the large quills. Use care not to cut skin around tail, as at knee.
With bird still held on end, start peeling skin down over back and sides. Use scalpel if skin adheres tightly. When pelvis is uncovered, if a small bird, take rump betwen two forefingers and thumb of left hand; if a large bird, hang up on a wire hook and cord, and skin down to shoulders. Press wings forward strongly to loosen joint muscles. Cut through one shoulder joint and
then other, going carefully as at knee and tail, so as not to cut skin on opposite side.
Plug with cotton or dry with meal wherever
necessary to stop flowing blood.
Next peel the neck skin down over head to bill, pulling out ear linings when met with and using care to work close to skull when cutting eyelids free.
When this is done, cut off base of skull. With this the skin is free from the body and inside out.
If the specimen is of a species with neck skin too small to peel over the head, turn head and neck back right side out when neck is only partly skinned down. Make an incision from middle of back of head down nearly half length of neck, alongside where nape is bare
of feathers. Through this incision turn and clean the head.
Further cleaning of the bird
With the skin removed, turn attention to details of cleaning away leg, wing, and tail muscles, removing eyes, brain, and jaw muscles from skull and scraping out whatever fat is in the skin.To clean leg bones, skin out the thick, meaty shins, using thumb nail and scalpel to aid where necessary, down to heel joint or upper end of tarsus. Just above this joint sever the tendons, front and back, and peel leg muscles off.
In owls skin on down the tarsus to as near foot, or toes, as possible and clean out tarsus muscles.
In large birds, next split ball of foot, insert point of a steel spindle under base of tarsus tendons beside hind toe and draw these cords out. This will sometimes require a strong pull. Always do this after the leg, above has been cleaned.
In small birds it is not necessary to split ball of foot nor to remove these tendons.
Next remove the wing muscles. Peel skin down to elbow. Cut tendons free just above elbow and strip muscles off. To clean forearm in a small bird, use the thumb nail to shove skin forward toward wrist, on front of wing, without breaking union of large, secondary flight feathers with wing bone.
With scalpel cut and lift out elbow ends of forearm muscles, strip them out down to as near wrist as possible and cut off.
In a large bird, split skin of forearm and hand along under side after carefully separating feathers over bare strips of skin. Peel skin back both ways and remove flesh neatly. Scrape out whatever flesh is in evidence on hand bones in same way.
In a bird with no fat adhering to the skin, the skull and tail only remain to be cleaned in order to complete the skinning operation. To clean skull, remove eyes with a scalpel, scrape brains out through cut-off skull base, and trim away jaw muscles and a portion of roof of mouth.
To clean tail, peel it out carefully and scrape and cut away fat and meat adhering to bone and base of quills.
If you have a specimen with fat adhering to the skin in more or less loose patches, as in hawks and owls, simply scrape or peel the fat
off with a knife and thumb and finger.
If a fat duck skin is to be prepared the inside layer of skin over the fat tracts must be sheared off carefully with scissors and the fat then removed with a skin scraper or dull knife blade, care being exercised not to tear the outer skin or to pull through feathers with the grease.
Degrease the bird
To clean and degrease a bird skin which requires such treatment to prepare for mounting.Dusting the bird
When nearly all the moisture is drawn out dust skin in the plaster until natural fluffiness is restored.Do this last out of doors, where the skin may be beaten well when thoroughly dry, to free it of plaster dust. Lay skin, right side out, over the left hand and beat with the right, giving an occasional shaking, the better to loosen plaster dust.
An A1 duster may be made from the brush of an ox tail. Nail this on a short piece of broomstick and square ends of hair with scissors. This duster is used instead of beating the plumage with the hand and does the work much quicker and better.
When the dusting is done turn the skin inside out again (see Fig. 2 )
 and brush, then turn skin right side out and brush a little of the solution upon the feet, under side of wings, and inside the bill.
Apply arsenic solution
When poisoning the head, with skin inside out, one step in preparation for mounting is to be taken. After the arsenic-water is applied to skull and scalp, fill eye sockets with chopped tow or fine excelsior, put a light layer of cotton smoothly around the skull, forward edge close down to bill. Turn skin carefully back over skull and finish.It is best, if possible to do without risk of decay, to fold the freshly prepared skin in a clean paper, wrap in damp cloth, and lay over one night in a cool place, before mounting.
Now that we have completed the skinning of the bird we can move on to the construction of an artificial body for the bird